BIT SELECTION AND DRILLING

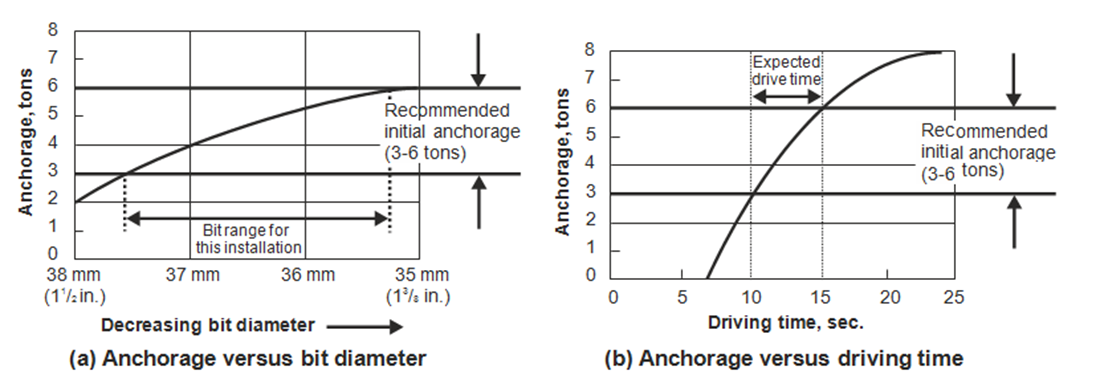
To select the correct drill bit diameter for meeting the recommended initial anchorage of 3 to 6 tons, drill several holes with bit diameters ranging from /8 to 1-1/2 inch (35 to 38 mm).

  • Drill each hole at least 2 inches (5 cm) longer than the bolt
  • Number each hole and record the bit size.

In soft ground, a bit may drill a hole larger than its diameter. In hard abrasive ground, the hole may be the same diameter as the bit. 

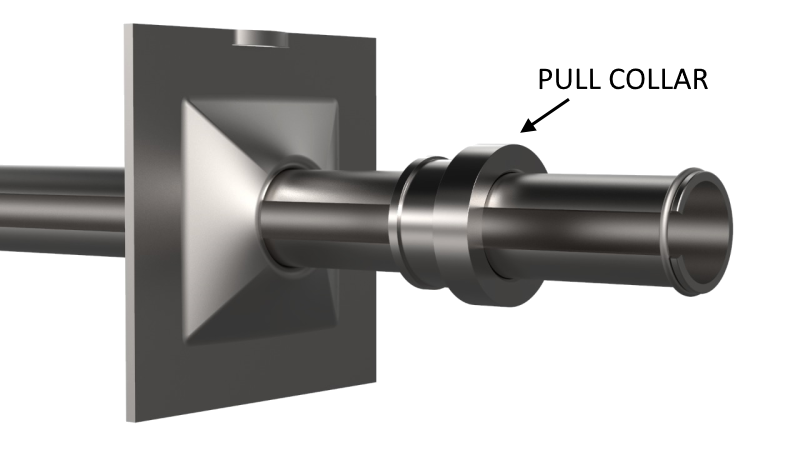
Drive into each hole an SS-39 Split Set stabilizer fitted with a pull collar as shown.

  • Record the driving time for each After insertion, observe the amount of slot closure inside each stabilizer.

To determine anchorage, perform a pull test.

  • Align the pull tester with the stabilizer, and pressurize it until the stabilizer slips in the
  • Watch to be sure that it is actually the stabilizer that has (When building up the pull load on the stabilizer, various adjustments may occur such as realignment of the tester housing, bearing plate settling, or localized rock crushing. These must notbe mistaken for tube slippage.)

Once the bolt has slipped in the hole, pressurize the tester pump until the bolt slips again. The same pull load should cause subsequent slippage.

Image module

INTERPRETING TEST DATA

After the above pull tests are completed, draw two graphs:

  • Spacer (a) Anchorage versus bit diameter.
  • Pull collar (b) Anchorage versus driving time.

Use the first graph to determine the correct bit size for your particular ground condition. As the bit wears, the hole will become smaller and friction will increase until the bit is replaced or the drill can’t drive the bolt completely.

Use the second graph to establish correct driving time required for this ground and bolt length. With a given bit, drill, bolt length, rock characteristic and constant pressure, insertion time will be proportional to initial anchorage. It’s important to establish this data for use in later spot checks, to assure that proper installation techniques are still being used.

Image module

ORDER INFORMATION

SS-39 Weight kg CPN
pull collar galv 0.2 89705569

STABILISER INSTALLATIONS FOR HAND MACHINE INSTALLATIONS

  • Drill a hole slightly smaller in diameter than the Split Set stabiliser. The recommended bit diameter for SS39 Split Set bolts is around 35 to 38
  • Ensure that the hole is drilled slightly deeper than the complete length of the bolt. This will allow the unit to be driven in again in areas where the collar may spall
  • Attach the appropriate driver tool. Check the condition of the driver tool, excessively worn driver tools can damage the unit during
  • Align the unit with the drilled hole and drive it
  • Check the time that it takes to completely drive the unit into the hole. The time taken to drive the unit in will be a guide as to the load that the fixture will be
  • A driving time of more than 25 – 40 seconds will generally result in a fixture holding around 7-8
  • In soft ground it could be necessary to reduce the bit diameter to increase the driving time, thus increasing the load the bolt will
  • Drive times of less than 10 seconds will usually result in a fixture that will hold less than the recommended load.
  • SS39 Split Set Stabilisers are generally most suitable in softer ground types.
Townsville – North Queensland

Phone: (07) 4774 6464 (Option 3)

Perth - Western Australia

Phone: (08) 9458 1188

Sydney - New South Wales

Phone: (02) 9832 3377

Brisbane - SE Queensland

Phone: (07) 4774 6464 (option 3)

Townsville – North Queensland

Phone: (07) 4774 6464 (Option 3)

Perth - Western Australia

Phone: (08) 9458 1188

Sydney - New South Wales

Phone: (02) 9832 3377

Brisbane - SE Queensland

Phone: (07) 4774 6464 (option 3)